Understanding the Foley Catheter and Its Critical Role in Patient Care
For the Foley Catheter Kit for Nursing Students, few skills are as foundational—or as high-stakes—as proper indwelling urinary catheter (Foley catheter) insertion and management. These catheters are vital tools used daily in healthcare to monitor strict fluid balance, manage acute urinary retention, and provide reliable drainage during and after various surgeries. However, with this essential skill comes profound clinical responsibility. Poor technique directly translates to patient risk, primarily the serious threat of Catheter-Associated Urinary Tract Infections (CAUTIs). Emphasizing this direct link between meticulous preparation, technique, and patient safety is paramount, making thorough student research and lab practice non-negotiable for success.
Worried about protecting your academic integrity? When using our service for class assignments, essays, or research papers, rest assured. We guarantee your personal information and work remain completely confidential and secure. Trust the discreet experts at StudentResearch.net.
What is a Foley Catheter Kit
- The Foley Catheter Kit is a pre-packaged, standardized unit containing all necessary sterile supplies for a single insertion procedure.
- This standardization ensures efficiency and minimizes the opportunity for contamination by eliminating the need to gather numerous individual items.
- Its central role is to facilitate Aseptic Non-Touch Technique (ANTT), ensuring that all critical insertion equipment remains untouched by non-sterile surfaces or hands, which is crucial for CAUTI prevention.
A Comprehensive Guide to the Kit Components
Essential Components Explained
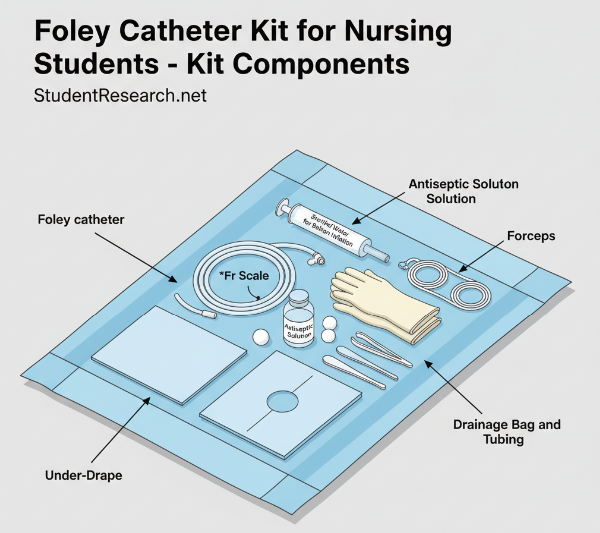
To master the procedure, you must first know every tool in your hand. The sterile portion of the kit typically includes:
- The Catheter: Its size is measured on the French scale (Fr). You must select the correct diameter to ensure effective drainage while minimizing urethral trauma.
- Balloon System: A pre-filled syringe containing sterile water (typically 10 mL) is provided to inflate the retention balloon once the catheter is properly seated in the bladder.
- Sterile Cleansing Supplies: This includes an antiseptic solution (like Povidone-iodine or Chlorhexidine), cotton balls or swab sticks, and sterile forceps to handle the swabs without contamination.
- Sterile Barriers: The kit includes sterile gloves and two sterile drapes (a small under-drape and a fenestrated drape with a central opening) to establish your working sterile field.
- Drainage System: The sterile urine collection bag and connecting tubing, often featuring an anti-reflux valve to prevent urine backflow.
- Lubricant: A sterile, water-soluble lubricant is essential to reduce friction and minimize patient discomfort during insertion.
How to Gather Non-Kit Supplies for Patient Prep
Before you open the sterile kit, you must collect non-sterile supplies for initial patient care and setup. These essential external items include:
- Non-Sterile Gloves: Required for initial patient peri-care before beginning the sterile procedure.
- Waterproof Absorbent Pad: To place under the patient for linen protection against fluids.
- Catheter Securement Device: A stabilization device (StatLock or equivalent) to prevent movement and traction on the catheter post-insertion.
- Adequate Lighting: Essential for visualization, especially during female catheterization, and a waste receptacle for immediate disposal of non-sterile items.
Choosing the Right Size
Selecting the smallest effective catheter size is a critical safety measure. For most adults, a 14 French (Fr) or 16 French (Fr) is appropriate. Larger sizes increase the risk of urethral trauma and irritation. You should only use a larger size if specifically indicated (e.g., severe hematuria requiring irrigation). Briefly note that a Coudé tip catheter (featuring a curved tip) may be indicated for male patients experiencing difficulty due to prostatic enlargement, as it can ease passage past the obstruction.
The Insertion Procedure – Step-by-Step Mastery
How to Prepare the Patient and Ensure Privacy
The pre-procedure steps establish a clean, safe environment for both you and the patient.
- Verify patient identification and explain the procedure thoroughly to gain informed consent and cooperation.
- Ensure absolute privacy and dignity by properly draping the patient (using a bath blanket) and minimizing exposure.
- Perform initial peri-care using warm water, soap, and non-sterile gloves to ensure the area is clean before setting up the sterile field.
- Position the patient: Supine with knees bent (female) or supine with legs extended (male).
- Optimize lighting and ensure all necessary supplies (kit and non-kit) are within comfortable reach.
Mastering the Sterile Field: Kit Setup and Glove Technique
Establishing and maintaining the sterile field is the single biggest factor in CAUTI prevention.
- Open the kit’s outer wrapping by unfolding the flaps, starting with the one furthest away from you, to create your clean working area.
- Carefully don your sterile gloves using the inner wrapper, taking care not to touch the outside of the glove or the inside of the cuff.
- Place the under-drape beneath the patient’s hips/thighs, followed by the fenestrated drape over the perineum, avoiding contamination.
- Organize the sterile field: Pour antiseptic over the cotton balls/swabs, open the lubricant, and attach the pre-filled syringe to the inflation port.
- Crucial Rule: The outer 1-inch margin of any sterile field is considered non-sterile. Never turn your back on or reach across the sterile field.
How to Insert the Catheter: Gender-Specific Technique
- Female Insertion:
- Separate the labia with your non-dominant, non-sterile hand (this hand is now contaminated).
- Cleanse using three separate swabs: far side, near side, then directly over the urethral meatus.
- Insert the catheter until urine flow is seen, then advance an additional 1 to 2 inches to ensure the retention balloon is safely past the bladder neck.
- Male Insertion:
- Hold the penis perpendicular to the body with your non-dominant hand (now contaminated), retracting the foreskin if necessary.
- Cleanse the meatus using a circular motion, working outwards.
- Insert the catheter fully until the Y-bifurcation is reached for secure placement.
- Universal: Ask the patient to take slow, deep breaths to encourage relaxation of the external urinary sphincter, which helps ease passage.
Final Steps: Securing the Device and Documentation
- Inflate the balloon fully using the entire volume (typically 10 mL of sterile water) in the syringe.
- Give a gentle tug to seat the balloon at the bladder neck before securing the catheter.
- Secure the catheter to the patient’s thigh or abdomen using the stabilization device (StatLock), ensuring there is no tension or pull on the meatus.
- Ensure the drainage bag is secured below the level of the bladder to promote gravity drainage and prevent backflow.
- Document the date, time, catheter size, amount of fluid used for balloon inflation, and initial urine characteristics.
Late-night study panic setting in? Whether it’s a term paper or a research project, you can get urgent help at 3 AM. Our academic services are backed by round-the-clock 24/7 support ready to answer your immediate questions. Achieve your deadlines with StudentResearch.net.
Post-Insertion Management – Preventing CAUTIs
Daily Indwelling Catheter Care: A Nursing Responsibility
Ongoing care is essential to prevent infection and complications.
- Perform daily meatal hygiene using mild soap and water to clean the catheter insertion site and surrounding area.
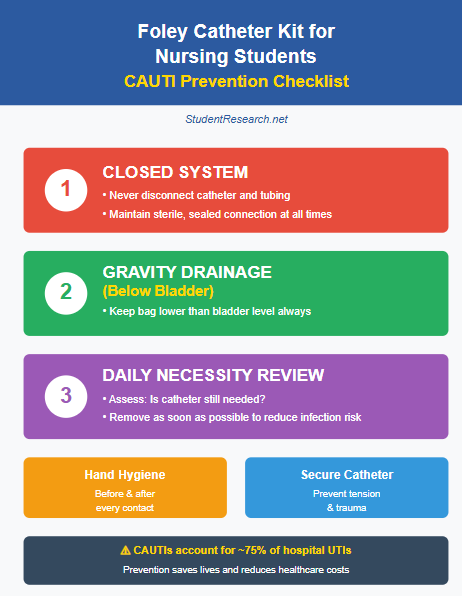
- Ensure the closed drainage system remains sealed at all times; never disconnect the tubing unless absolutely necessary and authorized.
- Always use strict hand hygiene before and after handling the drainage system to avoid introducing pathogens.
- Check the drainage tubing frequently to ensure it is free of kinks or dependent loops that could impede gravity flow.
- Encourage fluid intake (if not contraindicated) to promote continuous bladder flushing.
Why CAUTI Prevention is the Priority
Focusing on these critical interventions is how nurses win the fight against CAUTI.
- Minimize Use & Duration: The single most effective strategy is the “In and Out” philosophy: remove the catheter as soon as the medical indication is resolved. Review catheter necessity daily.
- Maintain Gravity Drainage: The drainage bag must always remain below the bladder to prevent retrograde flow of bacteria (reflux).
- Bag Management: When emptying the drainage bag, do not let the drainage spigot touch the floor or any contaminated surface.
- Specimen Collection: Never obtain urine samples from the drainage bag; use the designated needleless port only after cleansing it thoroughly with antiseptic.
- Securement: Ensure the catheter is properly secured to prevent movement and friction against the urethra, which can introduce bacteria.
Troubleshooting: What to Do If Drainage Stops
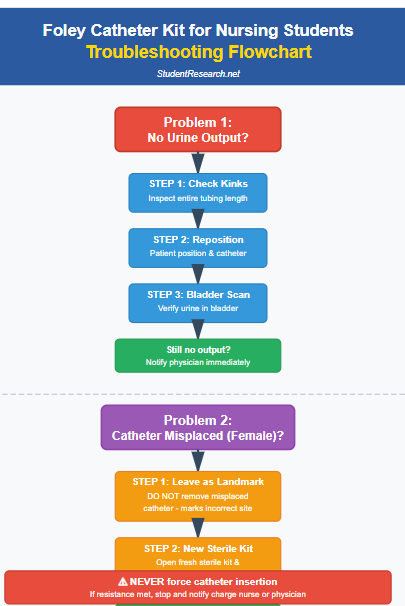
- If urine output suddenly stops, first check the tubing for kinks or if the patient is lying on the line.
- Attempt to gently reposition the patient and ensure the bag is securely below bladder level.
- If no urine is draining and the patient shows signs of bladder distention, a bladder scan should be performed to check for blockage. Report a persistent blockage immediately.
Conclusion
This guide stresses that true mastery comes down to two things: sterility and precision. By diligently practicing Aseptic Non-Touch Technique and following these steps, you reinforce the core message of patient safety. Embrace your lab practice and ask for supervision—competence builds confidence, ensuring you are prepared to safely care for your patients.
In summary, remember to master the Foley Catheter Kit for nursing students. Get step-by-step guidance on sterile technique, kit components, size selection, and essential CAUTI prevention tips.
FAQs
What if I Insert the Catheter into the Vagina?
- Do not remove it! Leave the mis-placed catheter in place to serve as a landmark to guide your next attempt.
- Obtain a new sterile kit immediately and use the mis-placed catheter as a guide to the urethra.
- Remove the original catheter only once the new one is confirmed to be in the bladder and urine is flowing.
How to Handle Resistance During Insertion
- Do not use force. This can cause severe trauma.
- Ask the patient to take a deep breath or cough; this often helps relax the external urinary sphincter, easing passage.
- If resistance continues (especially in male patients with potential prostatic issues), stop the procedure and immediately notify your supervising nurse or clinical instructor.
Why Did the Cathter Fall Out? Accidental Dislodgement Protocol
- If the catheter accidentally falls out, do not attempt to reinsert it (it is no longer sterile).
- Immediately assess the patient’s status (discomfort, signs of urinary retention).
- If recatheterization is necessary, you must use a brand new, sterile kit and restart the procedure from step one.
Tired of generic term papers? Get an assignment truly tailored to your professor’s requirements. We craft all your research projects and class assignments with free customization and revisions until the final product meets your complete satisfaction. Succeed confidently with StudentResearch.net.